Monday, February 28, 2011

Weekend Finds and a “Summer” Series


Went to a huge estate sale the other day, but it was a disappointment for me as I expected to come home with a cartful of goodies (not for my husband, though, who was so happy I didn’t come home with a trailer attached). I can say that there was an enormous amount of stuff, but it was mostly tables full of broken or chipped crystal and china.
However, I did score these sweet little bottles (above) for my windowsill (or I may sell them in my Country Tag Sale shop -- not quite sure yet, but don’t you love the color?)

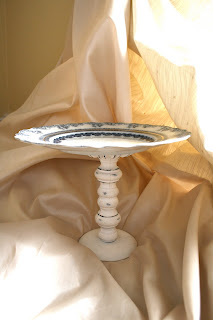
I also bought this pretty china plate, which I quickly converted into a cake plate with the help of some Gorilla Super glue and an iron candlestick I bought at a previous yard sale. Did I ever tell you that I have a “thing” for cake plates?


On another note, I went to the Annapolis Home Show as part of my job (home and garden editor for What’s Up Annapolis magazine) and got to interview Summer Baltzer from HGTV’s Design on a Dime and TLC’s Unhinged. She was gracious enough to grant me about an hour of her time to share some design trends and insight with me. I’ll be sharing some of her wisdom on this very blog in the next few days! So, stay tuned for the latest design trends from someone who knows.

Also, I will be writing a series of online articles based on this interview for What's Up? over the next few weeks so check that out, too.
Linking to Metamorphosis Monday

Friday, February 25, 2011

Doorbuster: Creating a Headboard

Did you ever price king headboards? Seriously. 
I wanted a dramatic headboard for my king size bed (actually two twins pushed together) so I saw this idea in a magazine or online…somewhere. I talked to my husband and he rolled his eyes. 
I bought three paneled doors at Home Depot (I think they were $35 each) and a piece of crown molding. I told him what I wanted and he actually came up with an idea to make it better (imagine that!) To cover the seams between the doors, he used decorative shoe molding or some kind of molding and he added a shelf to the top. To attach…he just drilled into the wall studs and they are there forever (unless I want to do some drywall repair…but, I don’t).
Yippee! My headboard was Beckie's pick this week:
Linking to
Visit thecsiproject.com

Thursday, February 24, 2011

My Magnificent Molding Corner Shelves


These only took my husband 11 years to build, but who’s counting? When we built this house, I told my husband that I wanted built-in corner shelves. I drew a picture. “No problem,” he said, “I can do that.”
So, we had the drywall guys build a base for my shelves and the bases stood there in the corner for 11 years... looking quite strange. I tried my best to decorate around them…using them to hold topiary trees and other large things. In the winter, my Christmas village stayed up in each corner until Easter.
Finally, about four years ago, he said that he would build them as a birthday present. I sketched what I wanted on a piece of paper (again) and he set out to Home Depot. The lumber sat in my living room for about six months.
When he finished, I had a party.
I absolutely love the shelves (and my husband). He may be slow, but that’s because he’s meticulous. He did a fantastic job. It’s done and now I can display my collections.

And, the Christmas village? It’s displayed on a large folding table and gets put back after New Years Day.

Visit thecsiproject.com
Transformation Thursday

Wednesday, February 23, 2011

This is for the Birds

...and the squirrels! Yesterday was a snow day so Kellen and I decided that we would take our gingerbread house (that's been sitting in my kitchen since Christmas) and turn it into a bird/squirrel feeder. We took off the huge lumps of candy where we could and slathered the whole thing with peanut butter. Then we remodeled...it now sports a lovely banana chip and bird seed roof. The "siding" was replaced with cheerios and almonds.

We used bird seed to fill in the spaces.


We took it out to the woods/brush across the street and put it up a little higher so that the dogs couldn't reach it, and then Kellen sprinkled some bird seed around it to attract the wildlife. I hope they enjoy the remodel!

Update: The only thing left is the cardboard...deer tracks led to the spot...hope the birds got some!

Monday, February 21, 2011

Time to Grow Up

Okay...I'm trying very hard to grow up and develop some consistency with my look...not my physical look, silly! My blog, my etsy shops, my business cards, etc.
Right now, they are all over the place...kind of like my art, kind of like me, but really, I do need to look more professional, don't I?
So, I love the look of my blog and my Country Tag sale shop...they seem to be in line. But, my other etsy shop, WheretheGrassisGreener, was purple and blue...pretty, but a little out of sync. So, I thought and thought until my puzzler was sore and came up with the banner above. It's actually a photo of a series of signs that I made for a local craft show. I tried my best to fade it and make it look kind of soft and dreamy like I feel my blog and other shop looks...what do you think?
Wait. Before you answer, just pop over to my shop and check it out there. And let me know via comment or email. I kind of like it and believe it's a step in the right direction, but seriously, I value your opinions.
Now, to change my business cards...it's hard to grow up.

Friday, February 18, 2011

Signs, Signs Everywhere Signs

"Signs, signs, everywhere signs..."If you’re as old as me, you’ll remember that song…if not, too bad, it was a good song.
Anyway, this really is about signs. I was recently commissioned to create eight signs for a client. She wanted something unique, old world, and personalized for her rental properties. So, I went to work and boy, have I been working…

Not sure if you remember, but in a recent post, I wrote about learning a Venetian plaster technique at my friend’s studio.  That's just what I used on these signs along with a raw umber glaze. Well, I love how the signs turned out, but let me tell you, it was a challenge fitting all the words on them and making them look special…I mean, how “old world” can you make “No Smoking please” and “Please Remove Shoes?” Anyway, the welcome sign was the most fun; I used two rusty skelton keys to create the "W" and then mixed up a batch of rusty colored paint to create the letters. Each letter is distressed with distress ink and then stamped with a musical score sheet stamp. 


The client, an artist herself, also wanted the words "Love and faith found here" so I added the words on a little heart that I created from a cereal box cut out covered with a rust mulberry paper and then distressed again with the inks.


A Little Knick Knack

Tuesday, February 15, 2011

Fun Finds at the Flea Market


Had some great finds this weekend including this old meat grinder, a nice box of these vintage door knob backers with chippy paint and pretty patinas: 


and this fab old bottle crate…I’m going to put the meat grinder up for sale in my etsy shop, use the door knob backs in my collage work and not sure what I’m going to do with this bottle crate just yet… any ideas?

Maybe storage for something; I don’t know, I just loved the color and the fact that it was old.


Sunday, February 13, 2011

Fun Idea: Valentine's Day Treasures

Every year, I have a "I lost my heart in..." treasure hunt for my kids. And, yes, even the teens participate (because it means they get food and candy). I create clues that resemble the sayings on those candy hearts.
Example: "You're just my Type" would lead to the typewriter.

Once they reach their destination, they find the treasure...usually lots of candy, cookies and sometimes cash.

Just a little idea from me to you.


Have a warm and loving Valentine's Day!

Friday, February 11, 2011

Incredible Art from Precious Hands

For the past two or three years, I have been involved in our school's annual fundraiser - a bull roast, which includes a silent auction. Last year, we decided to auction the students' artwork. It was a fun project, but a lot more work than we anticipated (especially when we had to "fix up" some of the final results).

This year, we decided, we would do things differently, learning from the past year that paint and grout and kids don't mix well.

After meeting with our wonderful art teacher, we decided to create square paper collages, that way each child's artwork would be highlighted on a 3" x 3" square of paper. Ms. Mason came up with the idea of doing a shape per grade. For example, kindergarten would use rectangles as their shape, fourth grade would use hearts and so on. Each kid had one 3" x 3" square to interpret their shape. The results were incredible and so varied!!! Here are some examples.
2nd grade - squares


3rd grade - Organic shapes:

4th grade- hearts (can you guess which one is my son's?)

Finally, 5th grade - stars: (we don't have K and 1st yet)

Aren't these so COOL?!

The next step: a few of us are gathering at my house to artistically arrange these shapes on poster board and then frame them for auction. We will have two framed works of art per grade and they will be sold as a set. We hope that parents will bid high because these are truly one-of-a-kind works of art that come from great little minds.

Stay tuned for the final framed results in a few weeks.

Oh, and if you are local and want to have a blast, join us for the Bull Roast on March 5th by purchasing tickets here - http://www.windsorfarmpto.org/Bull_Roast.html  click on "buy now" and your tickets will be mailed to you!

Wednesday, February 9, 2011

Artist Inspiration and a Mini Tutorial

Spent an afternoon at my friend Nancy's art studio the other day. It's a real art studio...It’s inside a very cool old building that's located on the water near Annapolis and occupied by three awesome creative women. It's so inspiring. There's stuff everywhere, art everywhere, paint everywhere, supplies everywhere...I mean it's genuine. Anyway, enough of the effusive drooling...
Nancy invited me down for the afternoon to teach me how to create an old world plaster look for one of my clients… signs that I'm creating for her rental properties. After a couple of attempts and Nancy's patient teaching, I think I finally got the hang of it. I left the studio with one practice sign and three other signs, ready for the next paint treatment, which is glazing. Here's a sneak peek (in the really cool studio) of the base coat. I am hopeful that I'll be able to show you the finished product by next week. I have eight signs to finish by the 25th. She only needs four of them by then, but I'm hoping to surprise her with the entire order. The other signs will be hand painted with a semi-crackle finish and maybe some texturized sections. I'm practicing new techniques right now. I wish I could share all my techniques, but honestly, I use a trial and error approach. However, here's one tried and true crackle method that I can show you right now:
Supplies:

  • Elmer’s Glue (I'm told this brand works best)
  • Two colors of craft paint
  • Paint applicators (I use sponge applicators)
1. Paint your base coat on your canvas, wood board, box, dog, whatever. This is the paint that will show through your topcoat. Let it dry.

2. Apply a coating of glue. Thicker coats provide a heavier crackle finish. If you want a subtler and smaller crackle effect, then apply a thinner coat of glue (which I did on top). Don't let it dry...wait a few minutes until it is tacky.

3. Coat with the top layer of paint (a different color and the primary color). Important: Just paint over one time...don't brush back and forth or it won't work as well.

4. Crackles will appear as it dries.

Tip: Practice to get the desired effect.
Linking to:


Hump Day link