Tuesday, November 29, 2011

A Tutorial: How to Paint a Camouflage Bookcase

And now for something completely different...a few posts ago, I blogged about creating a dream room for a little boy who is battling cancer. Read about it here and here. His mom approached me to create a camouflage bookshelf so I gladly said "yes!" (Not that I ever painted a camo bookshelf before.)
I started with this: a blonde wood bookcase with laminate shelves (below). Now, on to the tutorial:

1. I painted a base color of cocoa brown with Behr Paint and Primer (and yes, I tried to paint the laminate shelves, however, I could scrape the paint off with my fingernail so Plan B).
I asked my new buddy, Frank, (the man who made the ammo/helmet lamp) to cut two new shelves for Joey's bookshelf. Frank accepted the challenge and finished in one day. Thanks Frank! After two coats, the base coat was ready for camo!

2. Using the bedding pattern (sort of) from Joey's room, I sketched out a camo pattern on the outside of the bookshelves with chalk.

3. Then, I randomly marked where the colors should go. I worked with four colors -- brown, greenish brown (more like army green), tan and a lighter tan. Here's what it looked like (kind of like paint-by-numbers).

4. Leaving the base coat intact, I started painting with the lighter colors, painting them one at a time and letting them dry before moving onto the next color. I had to paint two coats on the lighter colors.
5. Then, I touched up any areas that needed touching up.
6. After it was finished, I stood back, looked at it, and added random base color to where I thought it needed a break in color -- where there was too much tan together.
7. After it dried, I added a coat of polyurethane (two coats to the top and the shelves) and well, here are the results! Sorry, couldn't get a picture of the whole thing in Joey's room (the rain outside made picture taking too dark and it looked bad with a flash!)


Monday, November 28, 2011

Attention Vintage Lovers: Cyber Monday Sale 15% Off All Day

I'm holding a cyber Monday Sale all day in my Country Tag Sale Shop! Save 15% on your total purchase  by using the coupon code: COUNTRYTAG15 at checkout. Here are some fun things in the shop:

VINTAGE TINSEL LIGHTS:
METAL NUMBER TWO:

EARRINGS AND NECKLACE SET

Have fun cyber shopping!!!

Sunday, November 27, 2011

Estate Sale Finds and Random News

Went to a HUGE estate sale on Friday...it was so crowded, that we actually left. Went back today for half price day and scored some great items even though it was stripped down to the bones. Here's what I got: beautiful vintage linens ... $1.00 for all five linens. That was the best bargain...the rest were okay, but I really liked the other items and couldn't pass up.

A great Pyrex butter dish for my shop:
A fluted vintage mold (which I'm using as a candle holder). I think it will look pretty on a silver tray for Christmas.
Some vintage, vintage-inspired tags:
Working double time this week to create some new things for an upcoming craft fair. I keep selling stuff from my store, so I have to replenish (it's good, but also stressful because I don't have enough inventory)!

Stay tuned, this week, I will be sharing a tutorial on how to create a camo bookcase.

******Also, tomorrow I am offering 15% off in my Country Tag Sale shop (vintage items) for Cyber Monday. Sale actually starts tonight.******

Friday, November 25, 2011

Oh Button Trees, Oh Button Trees, How Lovely are Your Buttons

Hope you all had a wonderful Thanksgiving! We sure did. My parents are here and my son is home from college. Just wanted to share this quick post and show off the rest of my button trees. These will go in my shop and to the craft show.
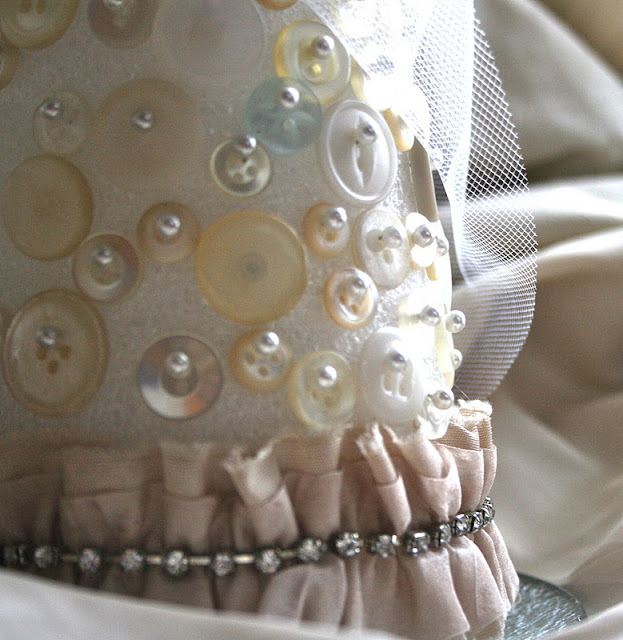
First up, this gorgeous (if I say so myself) doily-covered tree. I used pearlized pins by themselves as well as vintage buttons.


Next, a ribbon covered button tree:


Last, but not least, my youngest son's favorite: a tulle-covered, button tree:


Linking to:

Wednesday, November 23, 2011

Drum Roll Please. And the Winner is...

Congratulations to Anita at Going a Little Coastal!!! She is the winner of the Royal Design Studio $50 giveaway. She was selected using Random.org True Random Number Generator (which for the life of me I can't copy, paste and post so you'll just have to trust me). Anita, I'll be contacting you for your mailing address.

Anyway, come back to see the rest of my button trees after Thanksgiving as the weather here won't cooperate for good photos. Enjoy your Thanksgiving!

Here's just a peek at what I'm thankful for: My goofy family! (I don't think we have a serious family photo)

My Dog, Stoli:
My friends:


and all of you!
HAPPY THANKSGIVING!

Monday, November 21, 2011

Christmas Button Tree Tutorial

First, let me say that this is both easy and hard...I saw a gorgeous button tree on Pininterest and decided that I would make one for myself. After all, I had hundreds of buttons. I noticed that the tree was made using pearlized top pins and figured, "this would be simple to make!" Well, it is and it isn't... it takes patience and time (which I don't have, but alas, I managed).
Materials:
+One cone shaped Styrofoam form. Tip: I recommend white if you want to make my particular tree that way you don't have to worry about covering the green. Or you can use ribbon and wrap it around the tree to cover the green.
+Tons of white and mother-of-pearl buttons in different sizes (Way more than you actually think you need - no, I didn't count them, but I'm sure it's over 400.)
+Pearlized pins - over 400. You will need them with the large balls on top or else they will go right through the larger button holes.
+Wire cutters
1. First, you will need to cut down about 50 of your pins with wire cutters because if you don't they will stick out the other ends at the narrow top of the tree. An easy solution would be to find smaller pins, but I couldn't find them in the all white pearlized.
2. Next, spread out all of your buttons so you can see them.
3. Starting with largest buttons, randomly place them around the tree with the stick pin through the button hole.
4. Move to the medium sized buttons and randomly place them around the tree.
5. Fill in with smaller buttons. You can layer them if you would like. I didn't (I told you I have no patience or time).
I have to admit it, after three hours if doing this, I cheated and decided to wrap the bottom of the tree with this pretty ribbon I bought at Stampington & Company.
5. I wrapped the tree with some white tulle ribbon just to add a topper and dreamy softness.

I love how it turned out. I did make some other versions of button trees for my shop, which I'll post later (no where near as button filled as this one ... otherwise I would have to charge about $80 a tree!)

Saturday, November 19, 2011

Burlap and Vintage Lace...More Muslin Bags

I made a few more of the embellished muslin bags for the upcoming craft show -- they're also going to be/are in my shop. I  love making them...each time I just spread everything out on my floor and let the creative muse take over! Last night, I put on my pjs, turned on Pandora radio and just went to work. The men were watching hockey or something and no one bothered me for a few hours. All I needed was a glass of wine, (but since I had some at dinner, I thought better, and drank water).
Here's what I created:
First, I added more embellishment on the Number 25 bag with some antique lace and a little pearl pin. Then,
I cut out a flower from the same antique doily for the back. (This doily used to decorate my grandmother's dresser, but I don't think she would mind...plus it was very tattered.)

I made a couple more; they aren't quite finished yet, but here's a sweet little Christmas one I made from burlap and the same doily. I added a little "joy" charm just for fun and color.
Don't forget to enter my Royal Design Studio stencil giveaway here. And, stay tuned, I have a few other tutorials coming up...a vintage button Christmas tree and how to paint camouflage on a bookcase. (How's that for diversity?) Linking to: Faded Charm

Thursday, November 17, 2011

Stenciled Pillow Tutorial

I purchased an incredible stencil from Royal Design Studio last month and have been dying to use it. It's French script of a beautiful poem about Springtime. Right now, though, I have no time to use it on a wall, so I decided to try it on my new pillow covers in my family room. I wanted something subtle, so I choose a white fabric paint for the off-white canvas. The stencil is huge and Royal Design Studio provides great instructions for using it -- how to line it up, etc. I read them over and adapted them to a smaller surface area. 
You will need: fabric paint, cardboard, painter's tape, and a stencil brush or a sponge pouncer (for fabric stenciling).

Here's the tutorial...
1. First, wash and dry the fabric to remove any sizing.
2. Use a cardboard (I used leftover poster board) to insert in between the fabric of the pillow cover so the paint won't bleed to the other side.
3. Next, line up the stencil and tape it down so it doesn't shift when using it. I recommend using painter's tape, but I didn't have any so I used packing tape Note: definitely use painter's tape on a wall.

4. Begin stenciling using a stippling technique to work the paint into the fabric. When painting on fabric that is as absorbent as canvas, you will use a bit more paint, but you will still need to "offload" the brush so it doesn't seep under the stencil. I had to go over my pattern a few times until I figured out just how much paint to use.

5. Remove the stencil and let your fabric dry. You can heatset the paint on the fabric by tossing it into the drier for about an hour.


The result: I love the subtleness of this stencil on fabric. I can't wait to stencil another pillow! Note: I originally had a giveaway associated with this post hence all the comments...

Visit thecsiproject.com


Tuesday, November 15, 2011

Romancing the Bag

I've been having great fun creating new items to sell in my shop and at the craft fair. I ordered some muslin drawstring bags from Stampington & Co and went to work once they arrived. So, I opened all my craft drawers, vintage jewelry bins, stamp drawers, and started experimenting.  At this point, I've only designed two specifically for Christmas. The others can be used for gift or jewelry bags anytime.

I sewed little beads as ornaments on this stamped tree and added a little starfish charm on top.

I wanted to do something with numbers so I stamped 25 (Christmas Day) on a piece of muslin and then layered it on top of a burlap scrap. Buttons added for fun.
Here's a little Parisian-inspired bag that's already in my shop. This one sports some fringe that I had in my ribbon drawer and a vintage jewel.

Here's another that I created with an antique doily and a vintage pendant. I love how this one turned out.
!!!!Stay tuned for tutorials and a big giveaway later this week!!!! Linking to:


Sunday, November 13, 2011

Joy to the Wine Charms!

I went to my first real wine tasting this weekend...good wine, good friends and so much fun! I did learn a little about wines, too. I say "a little" because after tasting so many wines, I kind of forget what the sommelier actually told us, but it was interesting at the time.
As a hostess gift, I created Mr. and Mrs. wine charms that have been hot sellers in my shop. While I was making them and had all my materials sitting out, I decided to make a few Christmas charms to sell in my shop and give as hostess gifts for neighborhood parties. 


I found a bunch of stars that I had in my wood drawer (yes, I have a wood drawer, metal drawer, key drawer, etc).

I like how they turned out and how they look on a bottle of wine, too. I might just have to make some for myself, too!

Sharing this at:

Visit thecsiproject.com