

About a month ago, a local magazine, What’s Up Annapolis, asked me to create a holiday wreath for Wreathfest, a fundraiser for the Chesapeake Arts Center. The center auctioned the wreaths and they were also entered into a contest. The objective: create a wreath that represents your business. I searched the Internet for ideas and saw a great sunburst wreath created from rolled up paper, so I decided to create one for What’s Up. I’m proud to say that the wreath won in the “Most Unusual” category!
I wrote a little 10-step tutorial in case you want to create one yourself.
Materials needed:
- Several magazines
- A 12” or smaller wire wreath frame
- Craft glue
- Cardboard
- Scissors
- pop-up adhesive dots
- Patience
1. Grab a mag. Separate pages from the magazine. If there is a ragged edge, trim it. You need a lot of magazine pages to create this wreath, and after doing this, I learned that pages with a color border create some of the most interesting roll ups.

2. Start with one page and dab some glue in the corner and start rolling at the other corner on a diagonal. I used a pencil to help roll it a little more tightly and easily. However, don’t roll it so tightly that you can’t get the pencil out with a quick shake. (If you can’t get the pencil out: poke it with a skewer or stir stick, and next time, don’t roll it so tightly.)


3. Make a lot of these. A lot.

4. Take a break (you will want one) to cut a large circle out of cardboard (no pic, sorry). You want this circle to about an inch less than the circumference of the outside of the wire frame. Once you have the circle, cut out the center to form a cardboard wreath. Set this aside and start rolling more pages.

5. One at a time slide the rolled up magazine pages into and under the wire wreath frame. Put a dab of glue on top to hold in place.


7. Once you’ve completed the entire circle, glue the cardboard wreath on top of all the attached rolled up magazines to hide the way you attached them. (Sorry forgot to photograph this part).
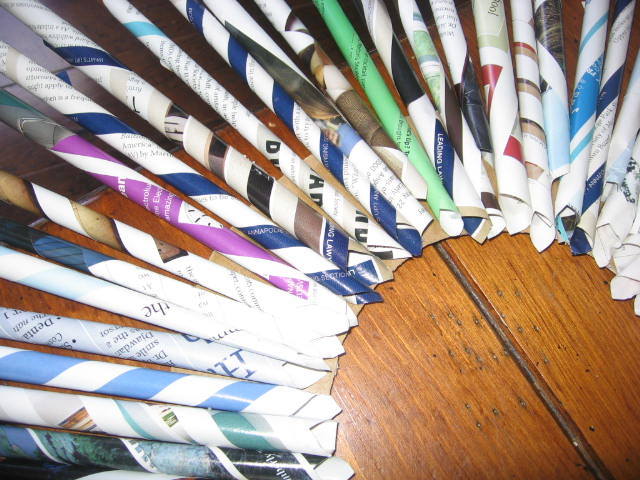

8. Then, glue the rest of your rolled up magazines on top of the cardboard wreath forming a “second level” of wreath. Fill in any spaces with rolled up pages.

9. To hide any blemishes (I crushed a few of my roll ups) and create interest, you can make flowers from the magazine cover. (Covers are sturdier and easier to work with.) I chose to use the masthead to create my flowers (and market the magazine).

I cut three shapes per flower – they were all exactly the same size and shape. (I did this freehand.) I curled the flower ends by rolling them around a pencil. Using “pop-up adhesive dots,” I layered the three flower shapes and added a circle for the center. Tip: you can also use a button or large bead for the flower center.

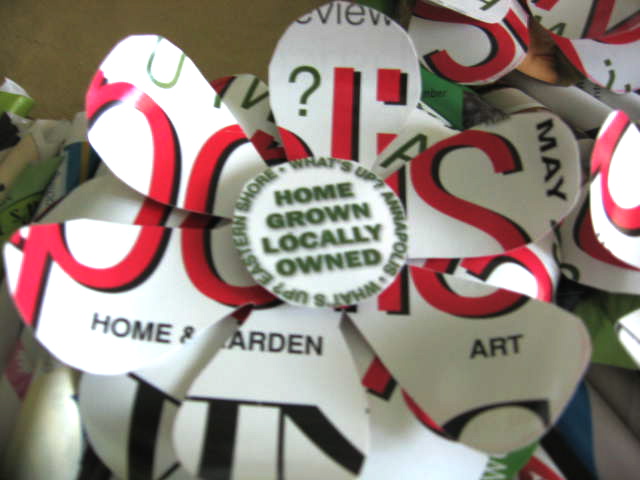

10. Attach the flowers to the wreath with glue. Ta da! It’s done.

Takes patience, but it’s pretty cool when it’s finished. Any questions? Just leave me a comment or shoot me an email. I'm linking to:


20 comments:
Very cool looking wreath! I've never seen one like this before. Congrats on the win! :)
This is such a great idea! It would be so fun made out of one of those big toystore books that they send out around Christmas!
I LOVE recycled projects! This one is super cool.
Renee,
OMG I love it! I'm very excited about this wreath tutorial for two reasons #1. I LOVE Magazines and have tons of them lying around (they are my vice) #2. Now I have something to do with that wire wreath form still laying around after my tootsie roll wreath fail.
Thanks for posting this gorgeous wreath and tutorial and Congrats on the win!
~Jazz
i know it took you a long long long long time, but renee, this is my most favoritest ever of your projects!!!!!!! i LOVE IT!
Renee- This is very cool! I love it! Great Love your blog...sorry it has taken me so long to come over and visit!
Tammy :-)
JUNK WILD
Renee- This is very cool! I love it! Great Love your blog...sorry it has taken me so long to come over and visit!
Tammy :-)
JUNK WILD
Renee- This is very cool! I love it! Great Love your blog...sorry it has taken me so long to come over and visit!
Tammy :-)
JUNK WILD
Wonderful colorful wreath...love this!!!
Hello! I found you through the Boardwalk Bragest. This wreath is so cheerful and unique! I may just have to try this. Thanks for sharing. You gave great instructions! I'm your newest follower! :)
Kelly
this wreath is fantastic!
Love, love, love!!
Congrats on your winning wreath! It's a great project and you wrote a wonderful tutorial. Thanks!
Jane
Wow -- this turned out really great! Just look at all the colors that shine through. Great idea and thank you for sharing your "how to". So glad you shared on the Boardwalk Bragfest! It is a marvelous "bragable".
Wow! That's so cool! I think it was worth the time.
What a great wreath! I love all the colors - very fun!
Wonderful! I saw something like this at the Scottsdale Performing Arts Museum Shop today. So very cool!!!!
What an adorable wreath ~ I love it!
I am begining a new linky party on Wednesday ~ "Fall" In Love. Please join in on the fun.
Have a happy and blessed Labor Day!
Very cool!
I love your wreath! WOW! : ) I am trying to find a project for my Mom and sister and sister in law to do this weekend and this might be the ticket. Thanks for sharing!
Post a Comment